
Those were the best videos yet that I have seen for viewing. Could see the vortexing clearly. Seems most of the air and fluid are entering over or by the SSR area. So much for the perfect cone air theory. Notice too that sometimes it sort of almost gets resucked up into and behind the back of the valve. As if there is a low pressure there behind the valve that will pull the air back in. Like the pickup tailgate model. I always thought air simply fell down into the cylinder. Tant so!
Tends to hang around the chamber area for some time first. Now on the question of value of the test. I would think it has merit if you are thinking about what may be occurring in the runnning engine after the overlap period has ended. As the piston really starts to move away from TDC I would think the vacumn pulse would for whatever time period set up a suction draw that would momentarily offer the pattern the wet flow bench is picturing. In other words I think you could say, this is the general direction or bias of the air and fuel for that brief moment in time that the piston is going down, the exhaust is fully closed, and the intake is nearing full lift. Can we say it shows port flow bias into the chamber and down the walls?
Thanks for sharing this Chris.
True throat/window, low port heads
73 posts
• Page 4 of 5 • 1, 2, 3, 4, 5
![]() by blaktopr » Thu Nov 27, 2008 12:11 pm
by blaktopr » Thu Nov 27, 2008 12:11 pm
Baby steps with testing to find a better way and easy for others to do. The vids also help me see what is happening to help diagnose a particular problem in my port. I must have watched it 25 times and every time I see something new. The pattern you speak of 200, is the basis of what can be found through testing and to see if there is a connection to a running engine, IMO. I have to try to rework the seat/chamber with the dykem because that alone changed how the port acted. There was more turbulence. I want to eliminate it for the tests to watch a full length of non turbulent flow in the chamber. It does show where turbulent mixture goes though which is another learning tool. What I am going to try is instead of doing a test at each lift, I am going to rig a "lobe" for the valve to lift off of. Turn on the machine, try to get a consitent liquid flow and do a vid at different speeds. Lets say 25 seconds from open to close and then maybe a run of cycleing speeds. I know its not a running motor but hey, who knows what may be seen.
Chris Sikorski
- blaktopr
- Posts: 336
- Joined: Fri Mar 14, 2008 8:03 pm
- Location: New Jersey
![]() by larrycavan » Thu Nov 27, 2008 2:59 pm
by larrycavan » Thu Nov 27, 2008 2:59 pm
What are you using to determine the acutal / proper amount of fluid to introduce?
I wonder how the pattern may change if the liquid is introduced via the intake manifold.........
Over or under sizing the fluid droplets may have significant affect on the outcome of a particular test.....so it seems anyway.... The longer the path the fluid has to follow, the greater the conditioning of the fluid prior to entering the chamber....the more likely for the pattern to shift...[I'm guessing]
One pretty easy thing to try out would be to superglue a strip of 60 grit sand paper to the port floor and / or other port locations to see what affect it may have without any other port or chamber mods. Lets simulate some texture variance....
200....You're interpretation could be spot on. I just don't know what to fully make of the outcome because we can't see whole cycle affects. One thing that bothers me is how much of the fluid is lost on overlap. More lost would equal less remaining to add to a vortex. Then again, maybe we make up for that with fatter jetting so the pattern goes unchanged? ? ? ? ?
Edited By larrycavan on 1227813291
- larrycavan
- Site Admin
- Posts: 1183
- Joined: Fri Apr 01, 2005 4:40 pm
![]() by 200cfm » Thu Nov 27, 2008 3:31 pm
by 200cfm » Thu Nov 27, 2008 3:31 pm
Table is being spread here so will post this up while the ladies are still busy.
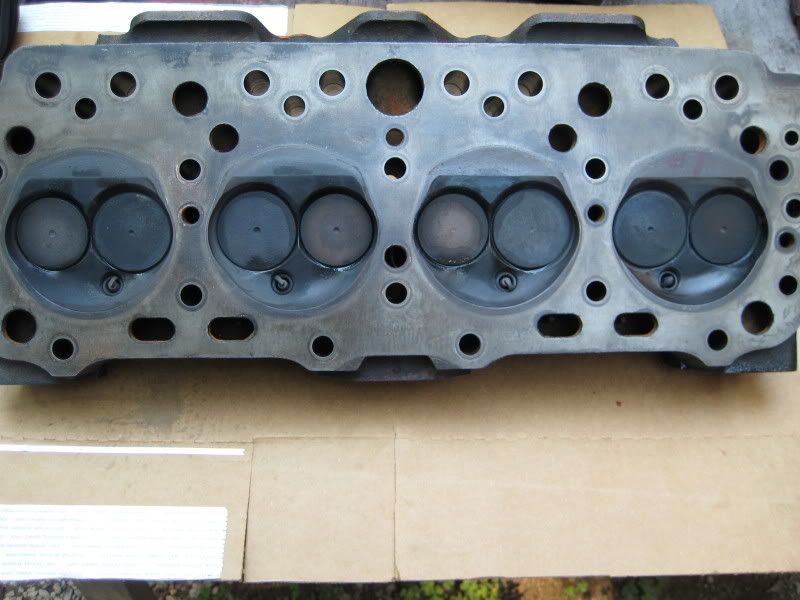
Here is a photo of the 1.780 chambers removed from the lost 298 motor. It had swirl marks on the back that were almost identical to the 330 heads.
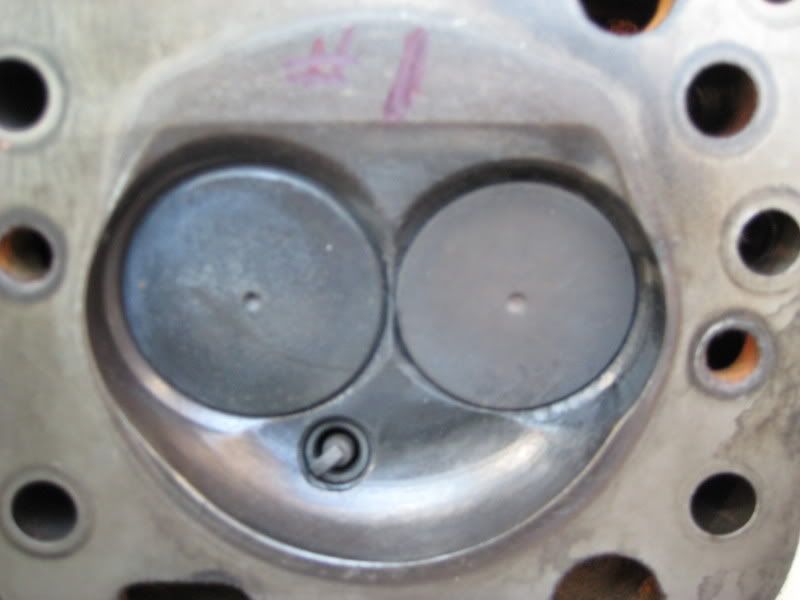
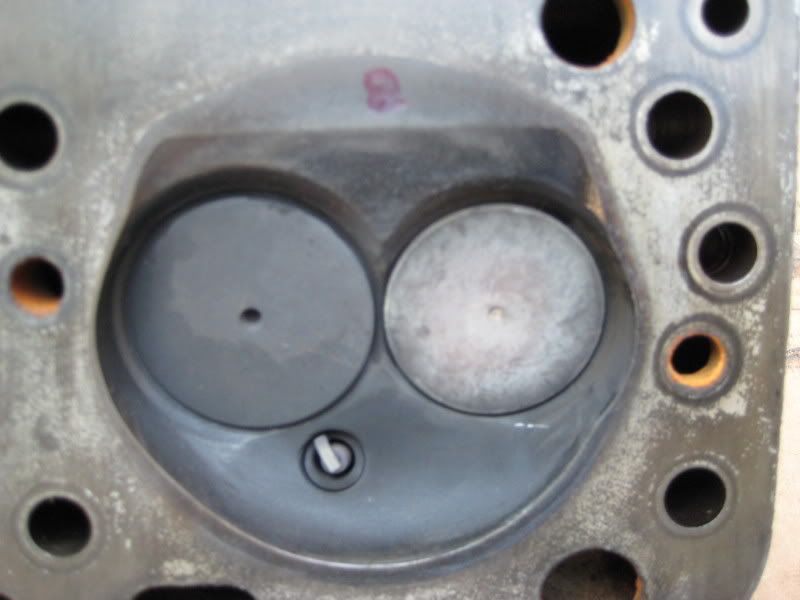
And here is the back side view of the swirl wash from the 330 heads taken before I reflowed them for this fall. Different head but the pattern was the same. You have to mental reverse the number 8 chamber for the proper orientation.
Here is a photo of the 1.780 chambers removed from the lost 298 motor. It had swirl marks on the back that were almost identical to the 330 heads.
And here is the back side view of the swirl wash from the 330 heads taken before I reflowed them for this fall. Different head but the pattern was the same. You have to mental reverse the number 8 chamber for the proper orientation.
- 200cfm
- Posts: 302
- Joined: Fri Nov 17, 2006 10:52 pm
- Location: Virginia
![]() by blaktopr » Thu Nov 27, 2008 11:40 pm
by blaktopr » Thu Nov 27, 2008 11:40 pm
Hey guys, thanks for contributing. This is getting fun, brain candy.
Larry, I have done tests varying the fluid introduced. The tool works the same as a verticle manometer. If I want more, I blow into the high side. I have varied the amount introduced and the patterns stay the same. You just see more fluid and droplets get bigger. I use the tube with one ..0025 hole to get a spray that I feel would mimick a running motor. This shows me what is happening on the walls and the droplet sizes from changing seats and the like. It's a "constant" only changed by how much speed is in the port. I have done tests with the intake before and did see that when the intake on calms the flow down and allow it to follow the ssr so does the liquid. More tests to come. Including the sandpaper idea. I may also try the texture idea at the fastest area of the chamber only to see if it keeps the fluid from combining with others to then form the vortex on the parts of higher pressure.
As for the overlap thing. During that time, the intake is not open too far. That may show why they say low lift flow is not a good thing. Keeps the mixture from entering the chamber during that time. But if not that way, the motor gets jetted to make up for it under a less efficient engine...? Now we would have to look at efficiencies of both the exhaust and intake tracts during the time of overlap. This is tough to discuss without taking into account refraction waves. Plus it is hard to know how much pressure differeential is between the cylinder and the exhaust tract. The really low pressure condition doesn't really start until the piston begins to move down the bore. At that instant the speed of the air in the exhaust slows and begins to go the other way and there is a high pressure before the valve closes. When timed right the higher pressure in the intake track keeps the reversion away. As mixture enters it searches for the lowest pressure. It may not go out of the exhaust because there is a high pressure front in there also. We try to optimise the low pressure in the cylinder and making the pressure in the intake higher than the exhaust during this time and the exhaust still having a higher pressure than the cylinder. This would tell me that when tuned correctly, there may be minimal loss of mixture ou of the exhaust. I can try cracking the exhaust valve open to see what that does.
Lets look at 200's pics, especially when you can see all the chambers. Look at the darkest spots. That tells me they are areas of slowest burn. Between the two valves at quench pad, behing spark plug between the valves, and on the sides of the valves close to the walls. Look at where the puddleing occurs on the vids. They are in the same areas. And because there is more fluid there, the oxygen would have to be greater in those areas to make it burn at the same rate as the other areas. Can you guys see the similarities? Fluid/air flow seems to go in the opposite direction in a high pressure area in relation to the low pressure/high speeds in the chamber and everywhere. Take a drink umbrella. While driving down the road, stick it behind your side view mirror with the small end facing forward. The umbrella will open. We can use this info to track how air/fuel reacts where there are pressure differentials in the chamber, in the chamber in relation to the valve seat/port, and inside the port itself. I feel I found a more definitive answer to the why of turbulence occuring by looking at it this way.
In relation to my port, I slowed the speeds down around the pinch. There is now a high pressure front along with more volume before the valve and with the ssr area. The ssr area is only so large in my case and drives up the speeds especially at the apex. So now the higher pressure from the entrance is forcing the air over the ssr like a crowd pushing on each other, forcing air to detach from the seat. In addition, because of the large speed differences at the ssr alone there are the pressure differentials there. The high pressure on the roof is forcing air down to the apex (in a matter of speaking) keeping the bulk of the mixture there to try to make that turn. Now how about when flow goes back across the valve in some cases back toward the ssr inside the bowl. High pressure on the long side is moving toward the ssr's high speed, low pressure. Now how the chamber comes into play. High speeds at the perimeter are creating a high pressure in the center and going in the opposite direction of the flow. This high pressure increases as the valve opens allowing flow and speed increases in that region. The high pressure layer begins to coax the air at high speeds to move toward the cylinder wall, so much so that it changes the flow bias through the port making the turbulent port flow mostly on the cylinder wall side of the port AND same place below the valve. Thinking of all this through what I found wet testing allows me to hopefully be on the right track and make the port more efficient (within the parameters of the port).
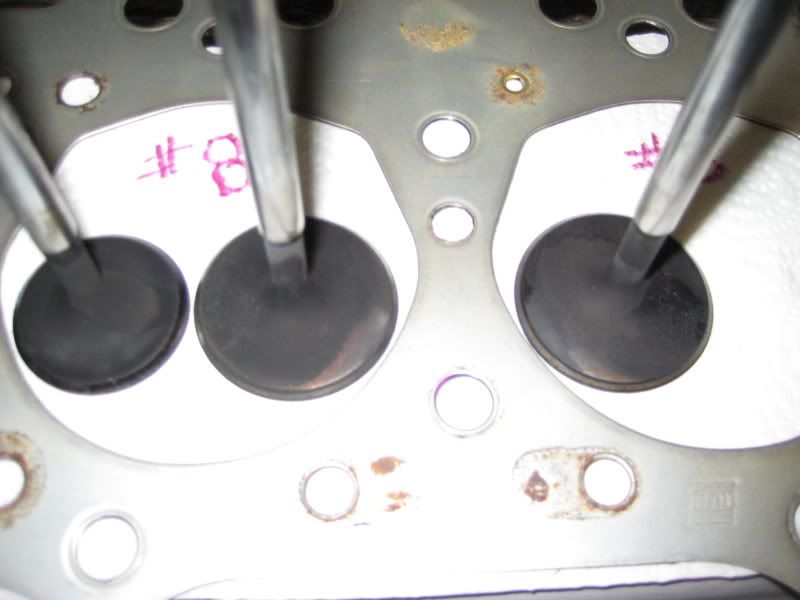
How about 200's valve pic and the clean spot. I want to look at this in a different perspective. Reversion and intake port efficiency. The valve has residue from the exhaust. If the push pinch is small, we can say there is higher pressure that can be at both sides. Because of the intake charge pressure being so far away, the exhaust is reverting back into the port over the valve. Because of the speed in the intake port, high pressure resides at the dead area in the bowl that was discussed in 200's posts. The higher pressure from the exhaust will run across the valve from the long side to the ssr side, as I mentioned before, but not overpowering the high pressure found at that spot of the valve, leaving it clean.
Chris
Larry, I have done tests varying the fluid introduced. The tool works the same as a verticle manometer. If I want more, I blow into the high side. I have varied the amount introduced and the patterns stay the same. You just see more fluid and droplets get bigger. I use the tube with one ..0025 hole to get a spray that I feel would mimick a running motor. This shows me what is happening on the walls and the droplet sizes from changing seats and the like. It's a "constant" only changed by how much speed is in the port. I have done tests with the intake before and did see that when the intake on calms the flow down and allow it to follow the ssr so does the liquid. More tests to come. Including the sandpaper idea. I may also try the texture idea at the fastest area of the chamber only to see if it keeps the fluid from combining with others to then form the vortex on the parts of higher pressure.
As for the overlap thing. During that time, the intake is not open too far. That may show why they say low lift flow is not a good thing. Keeps the mixture from entering the chamber during that time. But if not that way, the motor gets jetted to make up for it under a less efficient engine...? Now we would have to look at efficiencies of both the exhaust and intake tracts during the time of overlap. This is tough to discuss without taking into account refraction waves. Plus it is hard to know how much pressure differeential is between the cylinder and the exhaust tract. The really low pressure condition doesn't really start until the piston begins to move down the bore. At that instant the speed of the air in the exhaust slows and begins to go the other way and there is a high pressure before the valve closes. When timed right the higher pressure in the intake track keeps the reversion away. As mixture enters it searches for the lowest pressure. It may not go out of the exhaust because there is a high pressure front in there also. We try to optimise the low pressure in the cylinder and making the pressure in the intake higher than the exhaust during this time and the exhaust still having a higher pressure than the cylinder. This would tell me that when tuned correctly, there may be minimal loss of mixture ou of the exhaust. I can try cracking the exhaust valve open to see what that does.
Lets look at 200's pics, especially when you can see all the chambers. Look at the darkest spots. That tells me they are areas of slowest burn. Between the two valves at quench pad, behing spark plug between the valves, and on the sides of the valves close to the walls. Look at where the puddleing occurs on the vids. They are in the same areas. And because there is more fluid there, the oxygen would have to be greater in those areas to make it burn at the same rate as the other areas. Can you guys see the similarities? Fluid/air flow seems to go in the opposite direction in a high pressure area in relation to the low pressure/high speeds in the chamber and everywhere. Take a drink umbrella. While driving down the road, stick it behind your side view mirror with the small end facing forward. The umbrella will open. We can use this info to track how air/fuel reacts where there are pressure differentials in the chamber, in the chamber in relation to the valve seat/port, and inside the port itself. I feel I found a more definitive answer to the why of turbulence occuring by looking at it this way.
In relation to my port, I slowed the speeds down around the pinch. There is now a high pressure front along with more volume before the valve and with the ssr area. The ssr area is only so large in my case and drives up the speeds especially at the apex. So now the higher pressure from the entrance is forcing the air over the ssr like a crowd pushing on each other, forcing air to detach from the seat. In addition, because of the large speed differences at the ssr alone there are the pressure differentials there. The high pressure on the roof is forcing air down to the apex (in a matter of speaking) keeping the bulk of the mixture there to try to make that turn. Now how about when flow goes back across the valve in some cases back toward the ssr inside the bowl. High pressure on the long side is moving toward the ssr's high speed, low pressure. Now how the chamber comes into play. High speeds at the perimeter are creating a high pressure in the center and going in the opposite direction of the flow. This high pressure increases as the valve opens allowing flow and speed increases in that region. The high pressure layer begins to coax the air at high speeds to move toward the cylinder wall, so much so that it changes the flow bias through the port making the turbulent port flow mostly on the cylinder wall side of the port AND same place below the valve. Thinking of all this through what I found wet testing allows me to hopefully be on the right track and make the port more efficient (within the parameters of the port).
How about 200's valve pic and the clean spot. I want to look at this in a different perspective. Reversion and intake port efficiency. The valve has residue from the exhaust. If the push pinch is small, we can say there is higher pressure that can be at both sides. Because of the intake charge pressure being so far away, the exhaust is reverting back into the port over the valve. Because of the speed in the intake port, high pressure resides at the dead area in the bowl that was discussed in 200's posts. The higher pressure from the exhaust will run across the valve from the long side to the ssr side, as I mentioned before, but not overpowering the high pressure found at that spot of the valve, leaving it clean.
Chris
Chris Sikorski
- blaktopr
- Posts: 336
- Joined: Fri Mar 14, 2008 8:03 pm
- Location: New Jersey
![]() by larrycavan » Fri Nov 28, 2008 9:09 am
by larrycavan » Fri Nov 28, 2008 9:09 am
Might sound strange but you might try this out on the valve....
Get a can of spray foot powder. Spray a light coat on the back side of the valve, then run a wet test....see what shows up. In fact, might not be a bad idea to spray the entire port with it.......
Interesting concepts and results Chris. I've got a couple of heads ready and will be dry testing today. This post will be on my mind for sure......
Edited By larrycavan on 1227878375
- larrycavan
- Site Admin
- Posts: 1183
- Joined: Fri Apr 01, 2005 4:40 pm
![]() by blaktopr » Fri Nov 28, 2008 10:03 am
by blaktopr » Fri Nov 28, 2008 10:03 am
Thanks. I may be wrong or wrong about the way I put it all together. It comes easy to me and I question myself if it can be that way. It can't be that easy. It's that whole thing I said about others telling me "don't you think people allready know this?" Thats why I question myself so much and post my findings. Like maybe I'm going too far and overthinking things. These thoughts though explain to me why the tapered port works well and keeps back reversion. So I use the information that is known to work, stick in my theory. I then see a pattern, and apply that thinking to other things. If I see the theory then have an answer to something else, I move on to applying it to something else. These thoughts of mine explain to me why things happen in the system. From making power to port efficiency to problems. Now I can try to apply this to the changes I make in the tract, see if the change follows the theory, and what the end result will be. Thats why I said I don't like answers some may give when it comes to a particular "change". I want to know why that change does or doesn't work. Plus I can see how each port can have a different answer because of my theory of the many variables that are present in the port. I'm sure my thinking may change here and there as I test more. In my mind I think I am getting somewhere. Thanks
Chris
Chris
Chris Sikorski
- blaktopr
- Posts: 336
- Joined: Fri Mar 14, 2008 8:03 pm
- Location: New Jersey
![]() by larrycavan » Fri Nov 28, 2008 1:30 pm
by larrycavan » Fri Nov 28, 2008 1:30 pm
- larrycavan
- Site Admin
- Posts: 1183
- Joined: Fri Apr 01, 2005 4:40 pm
![]() by blaktopr » Sat Nov 29, 2008 2:04 pm
by blaktopr » Sat Nov 29, 2008 2:04 pm
Information overload. :p Did some tests in the port, found one thing that led to another and applying what I learned and think for the why. Tested backcut angles for the valves and the whys of what it does. Ran wet tests and found different swirl patterns and turbulence and found how it effects the puddleing and chamber action. I think my brain is about to pop! I actually had one runner/valve design show some promise and the air was reattached with a ball at the end of a 1/16 tube. The location was a new finding. Placing the ball in between the seat and valve with the tube in the high pressure area behind the push pinch where it expands over the ssr. Low pressure at the ball may have pulled air from that high pressure location using more window area and effecting the pressure recovery a bit in the chamber. I don't know. I have to take a break again. You have to see the notes on the eraseable marker board I have hanging next to the bench. I may post some stuff here on the wetflow board and or speedtalk about the wet patterns and flow directions in the chamber using different valve angles and the resulting different turbulence patterns found also. I did a valve to check with port flow and turbulence and pressure recovery to see if I can make the port think it has a bigger valve to hold the airflow back a little. Plus I figured by doing this will reduce the seat area a little to make the min csa more biased there. I was thinking that producing a lower pressure area around the valve and further into the chambe would help draw a little more air to the seat. What I got was something different. Don't know yet if it's good or bad or what. Man, I wish I had a dyno.
Chris Sikorski
- blaktopr
- Posts: 336
- Joined: Fri Mar 14, 2008 8:03 pm
- Location: New Jersey
![]() by bruce » Sat Nov 29, 2008 5:35 pm
by bruce » Sat Nov 29, 2008 5:35 pm
Just think of all those people out there who don't have a flowbench yet to take part in all this fun!!! 
"There is no more formidable adversary than one who perceives he has nothing to lose." - Gen. George S. Patton
- bruce
- Site Admin
- Posts: 1638
- Joined: Sun May 09, 2004 12:17 pm
![]() by blaktopr » Sat Nov 29, 2008 6:26 pm
by blaktopr » Sat Nov 29, 2008 6:26 pm
I threw a topic on Speedtalk called turbulence signitures in regular engine tech. Lots of vids and lots of my babbleing We'll see where it goes. I have to stay away for a couple days.
"Just when I thought I was out, they pulled me back in." That machine keeps calling me!
"Just when I thought I was out, they pulled me back in." That machine keeps calling me!
Chris Sikorski
- blaktopr
- Posts: 336
- Joined: Fri Mar 14, 2008 8:03 pm
- Location: New Jersey
![]() by blaktopr » Fri Dec 05, 2008 11:00 pm
by blaktopr » Fri Dec 05, 2008 11:00 pm
Made the port into more of a finished product. I still have some turbulence but now at .550 lift. I don't think I can widen the ssr any more and I feel the radius is very good and blended into the bottom cut. I have to ponder some more with these. I don't want to keep grinding and kill it. Here are the flow numbers as of now. And some pics.
.200 121
.300 181
.400 235
.475 259
.500 266
.525 274
.550 261
.575 261
.600 261
.200 121
.300 181
.400 235
.475 259
.500 266
.525 274
.550 261
.575 261
.600 261
Chris Sikorski
- blaktopr
- Posts: 336
- Joined: Fri Mar 14, 2008 8:03 pm
- Location: New Jersey
73 posts
• Page 4 of 5 • 1, 2, 3, 4, 5
Who is online
Users browsing this forum: No registered users and 1 guest