[phpBB Debug] PHP Warning: in file [ROOT]/includes/bbcode.php on line 483: preg_replace(): The /e modifier is no longer supported, use preg_replace_callback instead
[phpBB Debug] PHP Warning: in file [ROOT]/includes/bbcode.php on line 483: preg_replace(): The /e modifier is no longer supported, use preg_replace_callback instead
[phpBB Debug] PHP Warning: in file [ROOT]/includes/bbcode.php on line 483: preg_replace(): The /e modifier is no longer supported, use preg_replace_callback instead
[phpBB Debug] PHP Warning: in file [ROOT]/includes/bbcode.php on line 483: preg_replace(): The /e modifier is no longer supported, use preg_replace_callback instead
[phpBB Debug] PHP Warning: in file [ROOT]/includes/bbcode.php on line 483: preg_replace(): The /e modifier is no longer supported, use preg_replace_callback instead
[phpBB Debug] PHP Warning: in file [ROOT]/includes/bbcode.php on line 483: preg_replace(): The /e modifier is no longer supported, use preg_replace_callback instead
[phpBB Debug] PHP Warning: in file [ROOT]/includes/bbcode.php on line 483: preg_replace(): The /e modifier is no longer supported, use preg_replace_callback instead
[phpBB Debug] PHP Warning: in file [ROOT]/includes/bbcode.php on line 483: preg_replace(): The /e modifier is no longer supported, use preg_replace_callback instead
[phpBB Debug] PHP Warning: in file [ROOT]/includes/bbcode.php on line 483: preg_replace(): The /e modifier is no longer supported, use preg_replace_callback instead
[phpBB Debug] PHP Warning: in file [ROOT]/includes/bbcode.php on line 483: preg_replace(): The /e modifier is no longer supported, use preg_replace_callback instead
[phpBB Debug] PHP Warning: in file [ROOT]/includes/bbcode.php on line 483: preg_replace(): The /e modifier is no longer supported, use preg_replace_callback instead
[phpBB Debug] PHP Warning: in file [ROOT]/includes/bbcode.php on line 483: preg_replace(): The /e modifier is no longer supported, use preg_replace_callback instead
[phpBB Debug] PHP Warning: in file [ROOT]/includes/bbcode.php on line 483: preg_replace(): The /e modifier is no longer supported, use preg_replace_callback instead
[phpBB Debug] PHP Warning: in file [ROOT]/includes/bbcode.php on line 483: preg_replace(): The /e modifier is no longer supported, use preg_replace_callback instead
[phpBB Debug] PHP Warning: in file [ROOT]/includes/bbcode.php on line 483: preg_replace(): The /e modifier is no longer supported, use preg_replace_callback instead
[phpBB Debug] PHP Warning: in file [ROOT]/includes/bbcode.php on line 483: preg_replace(): The /e modifier is no longer supported, use preg_replace_callback instead
[phpBB Debug] PHP Warning: in file [ROOT]/includes/bbcode.php on line 483: preg_replace(): The /e modifier is no longer supported, use preg_replace_callback instead
[phpBB Debug] PHP Warning: in file [ROOT]/includes/bbcode.php on line 483: preg_replace(): The /e modifier is no longer supported, use preg_replace_callback instead
[phpBB Debug] PHP Warning: in file [ROOT]/includes/bbcode.php on line 483: preg_replace(): The /e modifier is no longer supported, use preg_replace_callback instead
[phpBB Debug] PHP Warning: in file [ROOT]/includes/bbcode.php on line 483: preg_replace(): The /e modifier is no longer supported, use preg_replace_callback instead
[phpBB Debug] PHP Warning: in file [ROOT]/includes/bbcode.php on line 483: preg_replace(): The /e modifier is no longer supported, use preg_replace_callback instead
[phpBB Debug] PHP Warning: in file [ROOT]/includes/bbcode.php on line 483: preg_replace(): The /e modifier is no longer supported, use preg_replace_callback instead
[phpBB Debug] PHP Warning: in file [ROOT]/includes/bbcode.php on line 483: preg_replace(): The /e modifier is no longer supported, use preg_replace_callback instead
[phpBB Debug] PHP Warning: in file [ROOT]/includes/bbcode.php on line 483: preg_replace(): The /e modifier is no longer supported, use preg_replace_callback instead
[phpBB Debug] PHP Warning: in file [ROOT]/includes/bbcode.php on line 483: preg_replace(): The /e modifier is no longer supported, use preg_replace_callback instead
[phpBB Debug] PHP Warning: in file [ROOT]/includes/bbcode.php on line 483: preg_replace(): The /e modifier is no longer supported, use preg_replace_callback instead
[phpBB Debug] PHP Warning: in file [ROOT]/includes/bbcode.php on line 112: preg_replace(): The /e modifier is no longer supported, use preg_replace_callback instead
[phpBB Debug] PHP Warning: in file [ROOT]/includes/functions.php on line 4752: Cannot modify header information - headers already sent by (output started at [ROOT]/includes/functions.php:3887)
[phpBB Debug] PHP Warning: in file [ROOT]/includes/functions.php on line 4754: Cannot modify header information - headers already sent by (output started at [ROOT]/includes/functions.php:3887)
[phpBB Debug] PHP Warning: in file [ROOT]/includes/functions.php on line 4755: Cannot modify header information - headers already sent by (output started at [ROOT]/includes/functions.php:3887)
[phpBB Debug] PHP Warning: in file [ROOT]/includes/functions.php on line 4756: Cannot modify header information - headers already sent by (output started at [ROOT]/includes/functions.php:3887)
Tractorsport Flowbench Forum Archive • View topic - Rob's bench (aka SuperRunner) - Mercdog/MSD style bench

Rob's bench (aka SuperRunner) - Mercdog/MSD style bench

A place to post links to your flowbench projects to share with everyone on the board.  You can share a description and pics also here please limit the size of your picture files to low res pics, Thanks

Postby SuperRunner » Fri Feb 24, 2006 2:13 am

I just got my motors and Mercdog plans on Wednesday...they just so happend to come on the same day. I then went out and got most of the supplies I needed.

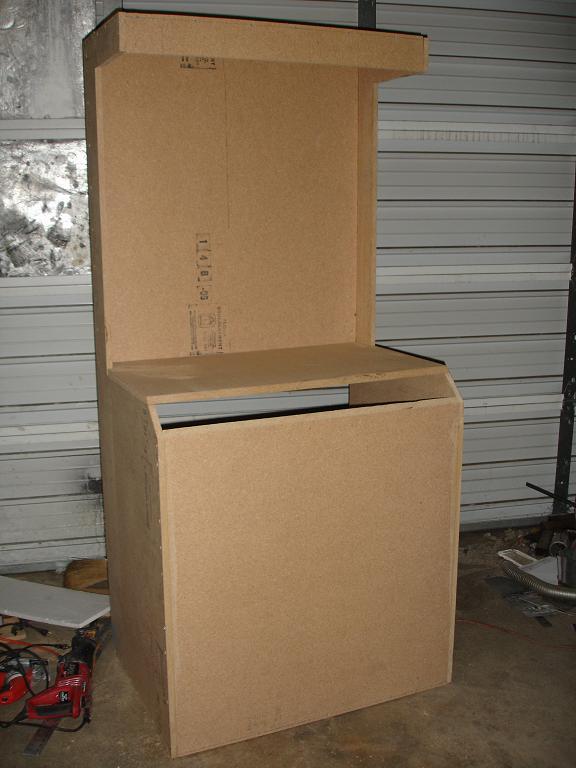
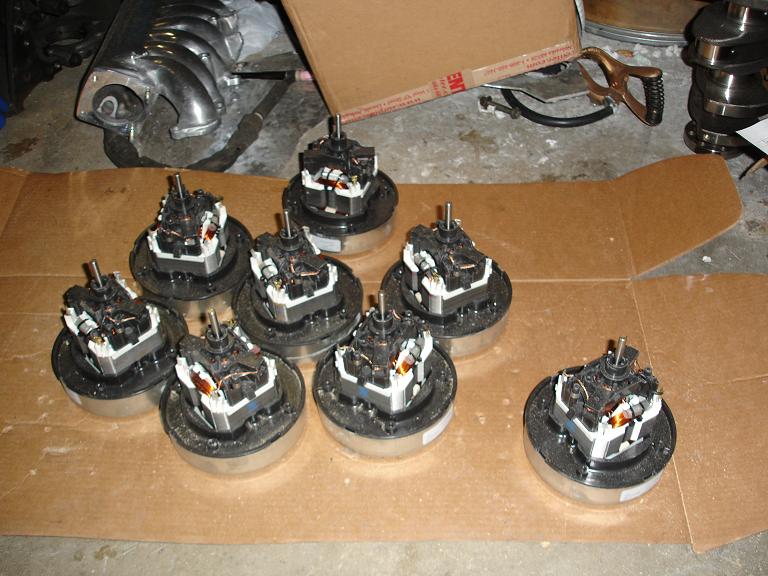
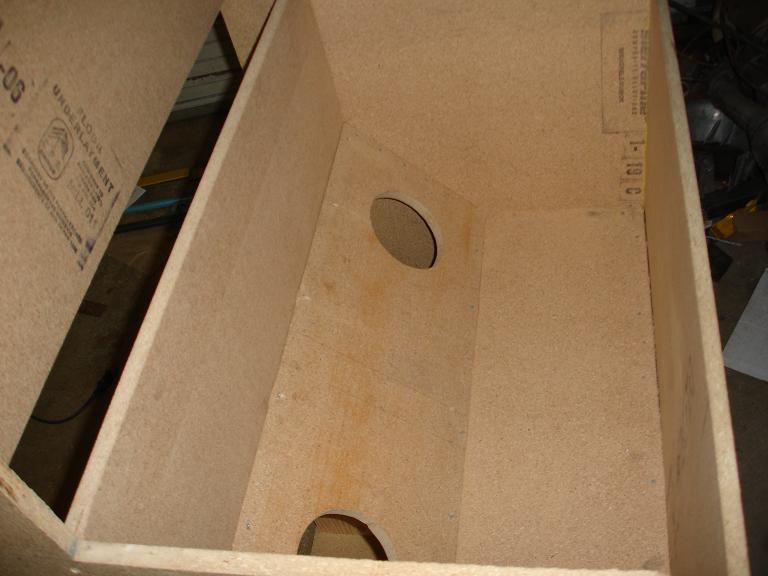
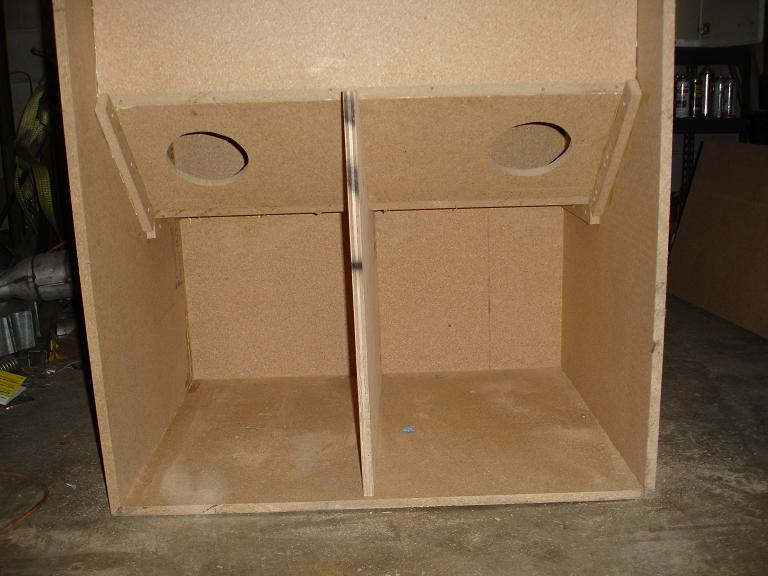
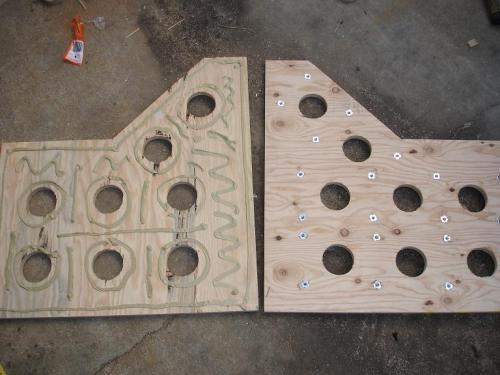
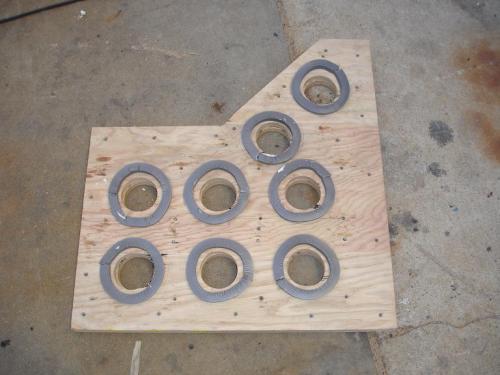
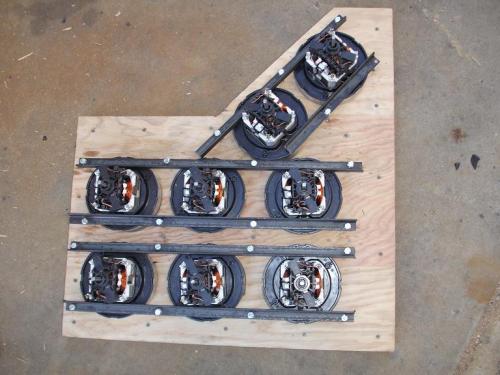
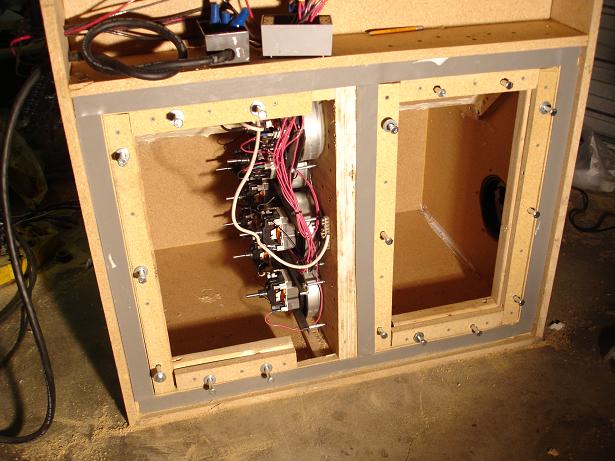
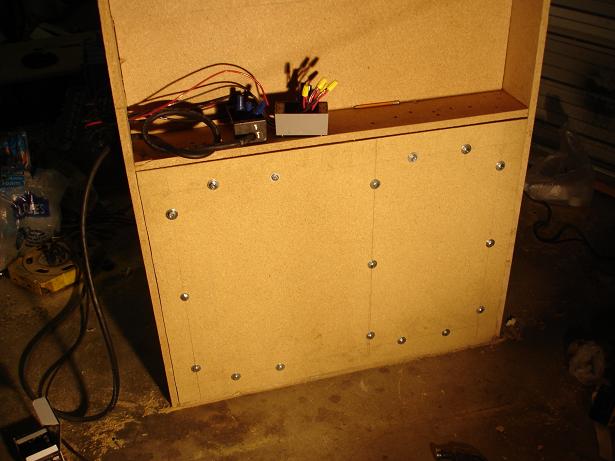
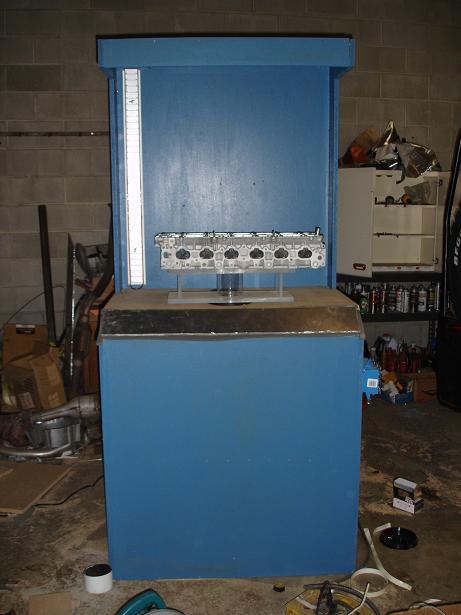
Here is my progress so far

Image

Image
Turbocharge EVERYTHING...that is how I see it.
SuperRunner
 
Posts: 92
Joined: Tue Feb 14, 2006 4:32 am
Location: utah

Postby Thomas Vaught » Fri Feb 24, 2006 12:08 pm

You have a great start on a bench.

Cabinet work looks good.

I would reinforce the cabinet prior to testing at any high exhaust or intake pressures. One of the best new re-inforcements deals I have thought about is using "t" nut type
fasteners (Home made with a bigger washer area) and making wooden blocks with a recess for the washer. I would glue (with liquid nails) the blocks in proper places in the bench and then add 3/8" threaded rod or similar with an adjusting sleeve for setting a slight tension. This would work for both pressure and vacuum testing.

The rods could be removed for maint on the bench (motors) and otherwise would be hidden inside the bench so the outside appearance could stay the same.

I would glue the blocks in then paint the cabinet inside several times with a good latex type paint to seal the porosity which several members of the forum have identified.

I would then finish the bench by doing the motor installation, wiring,
re-inforcement rod installation, etc.

JMO

Tom V.
Thomas Vaught
 
Posts: 465
Joined: Fri Feb 18, 2005 5:36 pm
Location: Michigan

Postby SuperRunner » Fri Feb 24, 2006 12:48 pm

Yeah, I was thinking about doing that to seal the backing on, but I also was looking at some other inserts as well a the T nuts, that looked a little stronger. I would have picked them up, but they only had 8 of them, so I need to go to a different store. Anyway, I am going run about 1 1/2" of particle board around the permiter of the inside of each side of the cabinet, and then re-inforce with blocks of 2x4 behind that with the inserts. Then add a piece of weather stripping. That way I could make the back removable.

I do like that idea of adding a threaded rod with an adjustment sleeve in the middle. Although, for the vacuum side, the threaded rod is a little flimsly, and might need to go with a larger diameter rod.

For my motor support, I chose to go with a mix of plywood and particle board. After seeing what happend to cboggs, it had me a little worried. Now it will NOT BREAK!!

I hope to have it all assembled by this weekend, and then let it dry and hopefully turn it on early next week.
Turbocharge EVERYTHING...that is how I see it.
SuperRunner
 
Posts: 92
Joined: Tue Feb 14, 2006 4:32 am
Location: utah

Postby SuperRunner » Fri Feb 24, 2006 2:52 pm

For my orifice, I am going to expermient with a double triangle design, where one is inverted over the top of the other.

One of th pieces will be stationary, and the other will be able to move by the use of a rack and pinion.


Will have to see how it works.
Turbocharge EVERYTHING...that is how I see it.
SuperRunner
 
Posts: 92
Joined: Tue Feb 14, 2006 4:32 am
Location: utah

Postby Thomas Vaught » Fri Feb 24, 2006 3:07 pm

Sounds like a plan, there guy.

Post up some pics as you get closer.

Tom V.
Thomas Vaught
 
Posts: 465
Joined: Fri Feb 18, 2005 5:36 pm
Location: Michigan

Postby 86rocco » Fri Feb 24, 2006 3:24 pm

86rocco
 
Posts: 319
Joined: Fri Mar 12, 2004 9:11 am

Postby SuperRunner » Fri Feb 24, 2006 4:32 pm

I need to get my hands on the calibration plates. I will adjust my flow until I get 100% with the particular plate, I will then mark that on a disk that will be welded to the rod that turns the gear. Each place that is marked, I cut out a small notch ball and spring (denton?), and this is how I will lock in the adjustment for the paticular flow.
Turbocharge EVERYTHING...that is how I see it.
SuperRunner
 
Posts: 92
Joined: Tue Feb 14, 2006 4:32 am
Location: utah

Postby SuperRunner » Sun Feb 26, 2006 12:30 am

I worked on it for a few more hours today, I kept messing up on the measurements because I changed a few things, and then forgot to adjust the other parts, so it was a litte slow today. Plus i tried resurrecting my old table saw...pretty much a waste of time. So I had to do all my cuts with my skill saw.

Image

Image

Image
Turbocharge EVERYTHING...that is how I see it.
SuperRunner
 
Posts: 92
Joined: Tue Feb 14, 2006 4:32 am
Location: utah

Postby SuperRunner » Wed Mar 01, 2006 9:09 pm

I decided I wanted to make my motors removable, only problem was that you really can't tighten them down as much as I would have like to, it crushes them and the motor won't turn. I need to put like a 2" spacer for the bolt to go in between the bracket and the board, and use locktight so the bolts don't back out. I used T-nuts, and put them in one of the boards, then I glued and screwed both boards together. I used some 1/2 weather stripping to seal the motors.

Image

Image

Image

Image
Turbocharge EVERYTHING...that is how I see it.
SuperRunner
 
Posts: 92
Joined: Tue Feb 14, 2006 4:32 am
Location: utah

Postby SuperRunner » Wed Mar 01, 2006 9:12 pm

Here is my head adapter. It is 3 3/4 ID, and later I will have to make a 4" and 4 1/2". The engines I mostly deal with are slighly over 3.5 so this is for that.

It cost me $50 from a local plastic supply store, and they even cut out a hole for the tube.

Image
Turbocharge EVERYTHING...that is how I see it.
SuperRunner
 
Posts: 92
Joined: Tue Feb 14, 2006 4:32 am
Location: utah

Postby Thomas Vaught » Wed Mar 01, 2006 9:53 pm

You can get a very nice seal by getting ahold of the HESCO company and purchasing some of the foam rubber "drum" seals that a vacuum motor would sit inside of in a tube vacuum. The seal can be glued to the boards. It has a lip for helping locate the motor vs the opening, and the seals are cheap, readily available, and are designed for the application. These seals will allow you properly seal the motor drum to the board without distorting the drum like you have done in the past.

Tom V.
Thomas Vaught
 
Posts: 465
Joined: Fri Feb 18, 2005 5:36 pm
Location: Michigan

Postby SuperRunner » Thu Mar 09, 2006 6:14 am

Got the back done. The way I designed this, I can actually pull the entire center section out. I built in slider guides with 3/4 plywood, It is soo tight, I had to kick it in, so it making a pretty tight seal. I have also gusseted both top and bottom of the upper 2 chambers for added support. I will also be adding metal support brackets. This box will easly be able to handle 40 plus depression.

Image

Image
Turbocharge EVERYTHING...that is how I see it.
SuperRunner
 
Posts: 92
Joined: Tue Feb 14, 2006 4:32 am
Location: utah

Postby SuperRunner » Sun Mar 12, 2006 2:05 am

I am about there. I got the air valves done, now I just need to make baffles, and finish the front panel, and put in the brass tubes.

Image
Turbocharge EVERYTHING...that is how I see it.
SuperRunner
 
Posts: 92
Joined: Tue Feb 14, 2006 4:32 am
Location: utah

Postby gofaster » Sun Mar 12, 2006 11:39 am

Great Pictures! Bench is looking good!
Jim
gofaster
 
Posts: 237
Joined: Fri Jul 01, 2005 6:39 pm
Location: Indiana

Postby Thomas Vaught » Sun Mar 12, 2006 2:39 pm

Will be moving some air soon!

Fire that dude up, we need a weather change in Michigan!

Tom V.
Thomas Vaught
 
Posts: 465
Joined: Fri Feb 18, 2005 5:36 pm
Location: Michigan

Next

Return to Readers Flowbench projects

Who is online

Users browsing this forum: No registered users and 2 guests

cron